
We all have email and sometimes it’s hard to know how to set it up. What follows is a basic tutorial on how to setup your email using Internet Message Access Protocol (IMAP) on Outlook 2013.
IMAP has some distinct advantages over POP mail, the most significant being where your mail is stored. With POP the email is downloaded to your mail client before being deleted off the server. Useful if you do not have multiple devices or have limited space on the server. IMAP stores the mail on the server so that it can be synchronised over multiple devices. Email backup can also be handled on the server side rather than on the client end.
To add your account to Outlook:

Click File
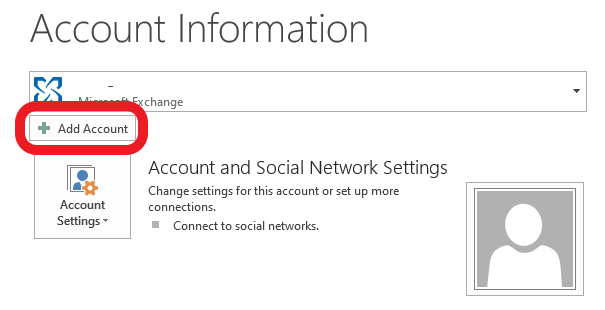
Add Account
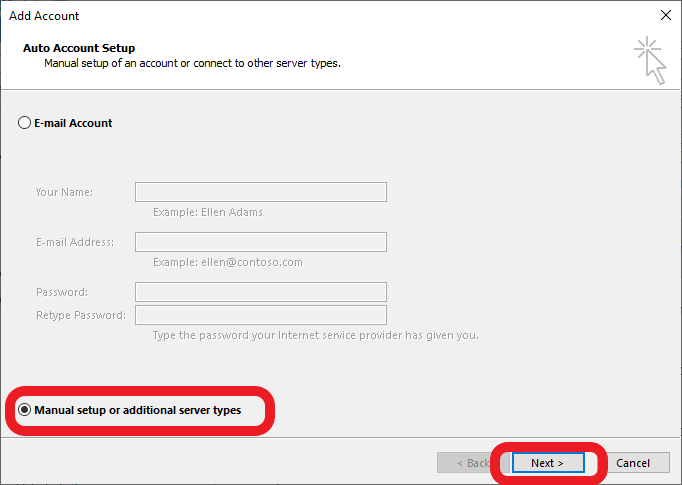
Select Manual Setup and then click Next
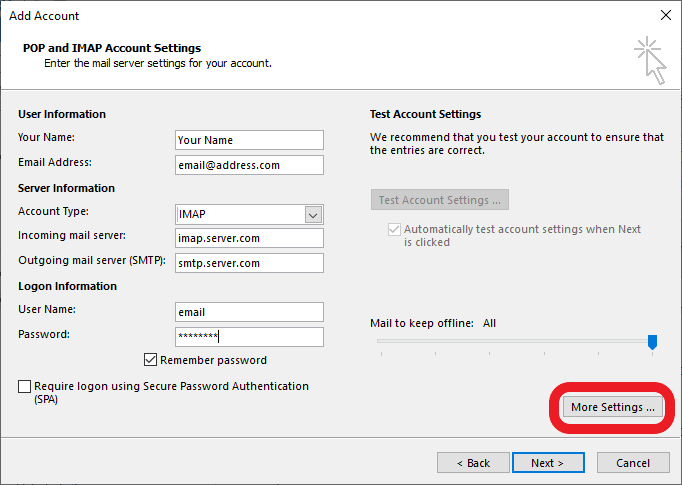
Enter your account information as supplied to you by your ISP.
Then click More Settings
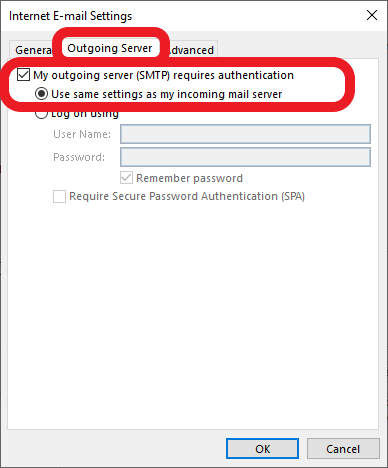
Select Outgoing Server, tick the box labeled My outgoing server (SMTP) requires authentication and leave the radio button on Use same settings as my incoming mail server.
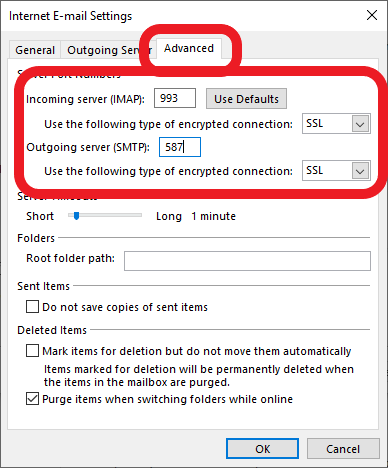
Select Advanced, then change incoming server to Use the following type of encrypted connection: SSL. Confirm that the port is set to 993.
Next set the Outgoing Server (SMTP) to SSL, THEN change the port to 587. If you do this the other way round it will revert to the default port.
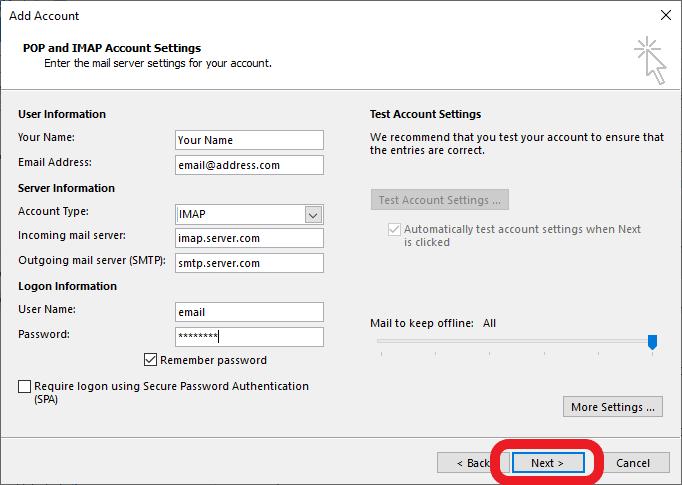
Click Next to finish. Outlook will test the connection and ensure that it has access before completing.
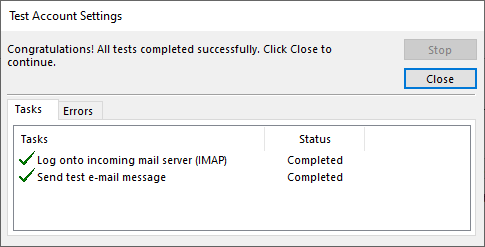
If you get all ticks then your account is setup correctly.
Click Close and we are done!

… [Trackback]
[…] Read More here on that Topic: cdss.co.za/how-to-setup-imap-email-in-outlook-2013/ […]
… [Trackback]
[…] Information on that Topic: cdss.co.za/how-to-setup-imap-email-in-outlook-2013/ […]
… [Trackback]
[…] Find More to that Topic: cdss.co.za/how-to-setup-imap-email-in-outlook-2013/ […]
… [Trackback]
[…] Read More on that Topic: cdss.co.za/how-to-setup-imap-email-in-outlook-2013/ […]
… [Trackback]
[…] Find More Information here to that Topic: cdss.co.za/how-to-setup-imap-email-in-outlook-2013/ […]
… [Trackback]
[…] Find More Information here on that Topic: cdss.co.za/how-to-setup-imap-email-in-outlook-2013/ […]
… [Trackback]
[…] Read More on that Topic: cdss.co.za/how-to-setup-imap-email-in-outlook-2013/ […]
… [Trackback]
[…] Find More Information here on that Topic: cdss.co.za/how-to-setup-imap-email-in-outlook-2013/ […]
… [Trackback]
[…] There you can find 8351 more Info on that Topic: cdss.co.za/how-to-setup-imap-email-in-outlook-2013/ […]
… [Trackback]
[…] Here you can find 43899 more Info to that Topic: cdss.co.za/how-to-setup-imap-email-in-outlook-2013/ […]
… [Trackback]
[…] Read More here to that Topic: cdss.co.za/how-to-setup-imap-email-in-outlook-2013/ […]
… [Trackback]
[…] Information on that Topic: cdss.co.za/how-to-setup-imap-email-in-outlook-2013/ […]
… [Trackback]
[…] Find More to that Topic: cdss.co.za/how-to-setup-imap-email-in-outlook-2013/ […]
… [Trackback]
[…] Find More on that Topic: cdss.co.za/how-to-setup-imap-email-in-outlook-2013/ […]
… [Trackback]
[…] Read More here to that Topic: cdss.co.za/how-to-setup-imap-email-in-outlook-2013/ […]
… [Trackback]
[…] Read More on that Topic: cdss.co.za/how-to-setup-imap-email-in-outlook-2013/ […]
… [Trackback]
[…] Read More Info here on that Topic: cdss.co.za/how-to-setup-imap-email-in-outlook-2013/ […]
… [Trackback]
[…] Information to that Topic: cdss.co.za/how-to-setup-imap-email-in-outlook-2013/ […]
… [Trackback]
[…] Read More here to that Topic: cdss.co.za/how-to-setup-imap-email-in-outlook-2013/ […]
… [Trackback]
[…] Read More on on that Topic: cdss.co.za/how-to-setup-imap-email-in-outlook-2013/ […]
… [Trackback]
[…] Information on that Topic: cdss.co.za/how-to-setup-imap-email-in-outlook-2013/ […]
… [Trackback]
[…] Here you will find 53327 more Information to that Topic: cdss.co.za/how-to-setup-imap-email-in-outlook-2013/ […]
… [Trackback]
[…] Find More Info here to that Topic: cdss.co.za/how-to-setup-imap-email-in-outlook-2013/ […]
… [Trackback]
[…] Information on that Topic: cdss.co.za/how-to-setup-imap-email-in-outlook-2013/ […]
… [Trackback]
[…] Read More on to that Topic: cdss.co.za/how-to-setup-imap-email-in-outlook-2013/ […]
… [Trackback]
[…] Information on that Topic: cdss.co.za/how-to-setup-imap-email-in-outlook-2013/ […]
… [Trackback]
[…] Information on that Topic: cdss.co.za/how-to-setup-imap-email-in-outlook-2013/ […]
… [Trackback]
[…] Find More to that Topic: cdss.co.za/how-to-setup-imap-email-in-outlook-2013/ […]
… [Trackback]
[…] Read More here to that Topic: cdss.co.za/how-to-setup-imap-email-in-outlook-2013/ […]
… [Trackback]
[…] There you can find 73883 additional Information to that Topic: cdss.co.za/how-to-setup-imap-email-in-outlook-2013/ […]
… [Trackback]
[…] Read More to that Topic: cdss.co.za/how-to-setup-imap-email-in-outlook-2013/ […]
… [Trackback]
[…] Read More on that Topic: cdss.co.za/how-to-setup-imap-email-in-outlook-2013/ […]
… [Trackback]
[…] Find More here to that Topic: cdss.co.za/how-to-setup-imap-email-in-outlook-2013/ […]
… [Trackback]
[…] Read More on that Topic: cdss.co.za/how-to-setup-imap-email-in-outlook-2013/ […]
… [Trackback]
[…] Read More here to that Topic: cdss.co.za/how-to-setup-imap-email-in-outlook-2013/ […]
… [Trackback]
[…] Read More to that Topic: cdss.co.za/how-to-setup-imap-email-in-outlook-2013/ […]
… [Trackback]
[…] There you will find 60706 more Information to that Topic: cdss.co.za/how-to-setup-imap-email-in-outlook-2013/ […]
… [Trackback]
[…] Find More on that Topic: cdss.co.za/how-to-setup-imap-email-in-outlook-2013/ […]
… [Trackback]
[…] Information on that Topic: cdss.co.za/how-to-setup-imap-email-in-outlook-2013/ […]
… [Trackback]
[…] There you will find 6600 more Info to that Topic: cdss.co.za/how-to-setup-imap-email-in-outlook-2013/ […]
… [Trackback]
[…] Find More to that Topic: cdss.co.za/how-to-setup-imap-email-in-outlook-2013/ […]
… [Trackback]
[…] Find More Info here to that Topic: cdss.co.za/how-to-setup-imap-email-in-outlook-2013/ […]
… [Trackback]
[…] Read More on to that Topic: cdss.co.za/how-to-setup-imap-email-in-outlook-2013/ […]
… [Trackback]
[…] Find More on that Topic: cdss.co.za/how-to-setup-imap-email-in-outlook-2013/ […]
… [Trackback]
[…] Here you will find 34521 more Information to that Topic: cdss.co.za/how-to-setup-imap-email-in-outlook-2013/ […]
… [Trackback]
[…] Here you can find 56450 additional Info to that Topic: cdss.co.za/how-to-setup-imap-email-in-outlook-2013/ […]
… [Trackback]
[…] Info to that Topic: cdss.co.za/how-to-setup-imap-email-in-outlook-2013/ […]